How to record and play a video message?
You can record a video message by capturing live camera view and microphone audio, and streaming it to a media server. Please see How to work with media server? on details of installing and configuring a media server. For illustrations in this section we assume that you have a media server running locally on localhost and has an application called myapp which allows you to record a media stream. Thus, your media server application should be reachable at "rtmp://localhost/myapp". In real deployment you will use the real host name or IP address of your media server.
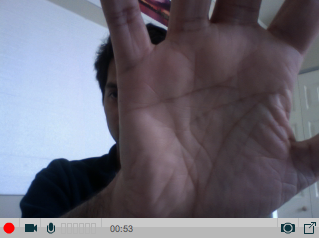
A screen-shot of VideoIO with record and play modes, and control panel enabled is shown below. In record mode, the control panel has buttons attached to VideoIO properties and allows you to stop/start recording, enable/disable camera, enable/disable microphone, change microphone gain, view microphone level, and show recorded time in seconds. In play mode, the control panel has buttons attached to VideoIO properties an allows you to start/stop playback, enable/disable sound, change sound volume, and see the progress of play head in the progress bar.

How to record a message?
The src property of the VideoIO application can be set to enable recording. For example, if you set the src property to "rtmp://localhost/myapp?publish=file1&record=true", it initiates a media connection to url rtmp://localhost/myapp, creates a media stream with name "file1" and then publishes the local camera and microphone data to the media stream with "record" parameter. This causes the media server to record the media stream in to a media resource identified by "file1". You can reset the src property to null or "" to stop recording.
To statically start the message recording on load, use flashVars as shown below. Additionally, if you use the controls property, the video control panel can allow the user to enable or disable the camera, microphone, gain and recording.
<object type="application/x-shockwave-flash" data="VideoIO.swf"
    id="video1" width="320" height="240">
    <param name="movie" value="VideoIO.swf" />
    <param name="quality" value="high" />
    <param name="bgcolor" value="#000000" />
    <param name="allowFullScreen" value="true" />
    <param name="allowScriptAccess" value="" />
    <param name="flashVars"
    value="controls=true&url=rtmp://localhost/myapp&publish=file1&record=true" />
</object>
Although it is possible to start and stop recording using individual properties such as url, record and publish, it is recommended to use the src property with record and publish as URL parameters. Additionally, you can start and stop publish using the recording property. If the video control panel is visible, then recording property is also attached to the record buttons record/stop states. Since recording a message automatically sets the live property, users will need to approve the device access. Please see How to show live camera view? for details.
To programmatically set the property, use JavaScript as shown below. The example shows a text input box which allows you to enter the src URL. When you click on the button to set, the value from the text box is assigned to the src property of VideoIO object named video1 to begin recording. When you click on the button to reset, the src property is reset to null to stop recording. If you are running your media server on a different host, just update the URL before clicking on set.
|
|
<object type="application/x-shockwave-flash" data="VideoIO.swf"
    id="video1" width="320" height="240">
    <param name="movie" value="VideoIO.swf" />
    <param name="quality" value="high" />
    <param name="bgcolor" value="#000000" />
    <param name="allowFullScreen" value="true" />
    <param name="allowScriptAccess" value="always" />
</object>
<script>
function getFlashMovie(movieName) {
    var isIE = navigator.appName.indexOf("Microsoft") != -1;
    return (isIE) ? window[movieName] : document[movieName];
}
</script>
<input id="src1" type="text"
    value="rtmp://localhost/myapp?publish=file1&record=true"/>
<input value="set" type="button"
    onclick="getFlashMovie('video1').setProperty('src',
        document.getElementById('src1').value)"/>
<input value="reset" type="button"
    onclick="getFlashMovie('video1').setProperty('src', null)"/>
|
There several related properties that interact to do message recording. For example, publish controls the name of the published stream, which eventually becomes the name of the recorded video file at the server for existing media servers. However, record property actually enables recording at the server, and without it the server will treat the published media stream as just live stream to be re-distributed to other players who request for that stream name.
The current implementation of VideoIO application does not support "append" mode, where an existing recorded resource can later be appended. Thus every time you set recording to true for a given publish stream name, the corresponding media resource file is created, ignoring any previous recording with the same publish stream name under that application scope. Depending on feedback and requirements from developers, we may add an "append" mode in future.
Typically, the recorded resource should be available as both real-time stream to play as well as web downloadable video file, depending on your deployment architecture, so that the user can use either streaming play mode or web-downloaded play mode.
How to play a message?
The src property of the VideoIO application can be set to enable playback of an existing media resource from the server. For example, if you set the src property to "rtmp://localhost/myapp?play=file1", it initiates a media connection and plays the stream named "file1". You can reset the src property to null or "" to disconnect the play connection.
Similar to the the record mode, the play mode VideoIO can be set statically using flashVars by settng the url and play properties. If you do not want to start playback immediately, you should set the autoplay property to false.
Although it is possible to start and stop play mode using individual properties such as url and play, it is recommended to use the src property with play as URL parameter. Additionally, you can start and pause play mode using the playing property. If the video control panel is visible, then playing property is also attached to the play/pause button's state.
To programmatically set the property, use JavaScript as shown below. The example is similar to previous one where you can set the src property of the VideoIO object. The object name is different, video2 to avoid conflict with the previous example. Assuming that you recorded a message with publish=file1 in the previous example, you can now play it with play=file1 in this example, using the same base URL of the src. Additionally, it has enabled the controls property to display the video control panel when you mouse over the application.
|
|
<object type="application/x-shockwave-flash" data="VideoIO.swf"
    id="video2" width="320" height="240">
    <param name="movie" value="VideoIO.swf" />
    <param name="quality" value="high" />
    <param name="bgcolor" value="#000000" />
    <param name="allowFullScreen" value="true" />
    <param name="allowScriptAccess" value="always" />
    <param name="flashVars" value="controls=true" />
</object>
<script>
function getFlashMovie(movieName) {
    var isIE = navigator.appName.indexOf("Microsoft") != -1;
    return (isIE) ? window[movieName] : document[movieName];
}
</script>
<input id="src2" type="text"
    value="rtmp://localhost/myapp?play=file1"/>
<input value="set" type="button"
    onclick="getFlashMovie('video2').setProperty('src',
        document.getElementById('src2').value)"/>
<input value="reset" type="button"
    onclick="getFlashMovie('video2').setProperty('src', null)"/>
|
This type of message playback with rtmp URL and play stream name is called streaming play mode. On the other hand, playback with http or https URL is called web downloaded play mode. The difference is that in streaming play mode the media is retrieved in real-time from the media server over RTMP, whereas in web downloaded play mode the media file is retrieved from the web server over HTTP. The web downloaded play mode wastes bandwidth if the user decides to stop the playback after seeing initial few seconds of a long message, whereas the streaming play mode stops the streaming when the user pauses the stream. We will talk about web download play mode in the next tutorial.
Summary
In summary, you can use the src property with URL parameter containing publish and record for message recording, or play for message playback. The recording and playing properties control the current state of recording or play mode.
This tutorial is just the begining of how to record and play a message using VideoIO. There are several other properties that affect behavior of recording, e.g., you can control the camera quality, video dimension, frames-per-second and bandwidth, the microphone gain level. Additionally, you can build other advanced user interface controls in JavaScript similar to how VideoIO's control panel shows in Flash.
The video displayed in publish and play modes are different. The publish mode displays the live camera view. In VideoIO the live camera view is always flipped horizontally to appear as if you are looking in a mirror, whereas the actual media stream sent to the server for recording or re-distribution appears as if the camera is looking at you. We feel that this gives the most natural behavior for live video chat or message recording.